Java Websockets example
To get access to the Fitty Camera URL and endpoint for the sockets please contact our team.
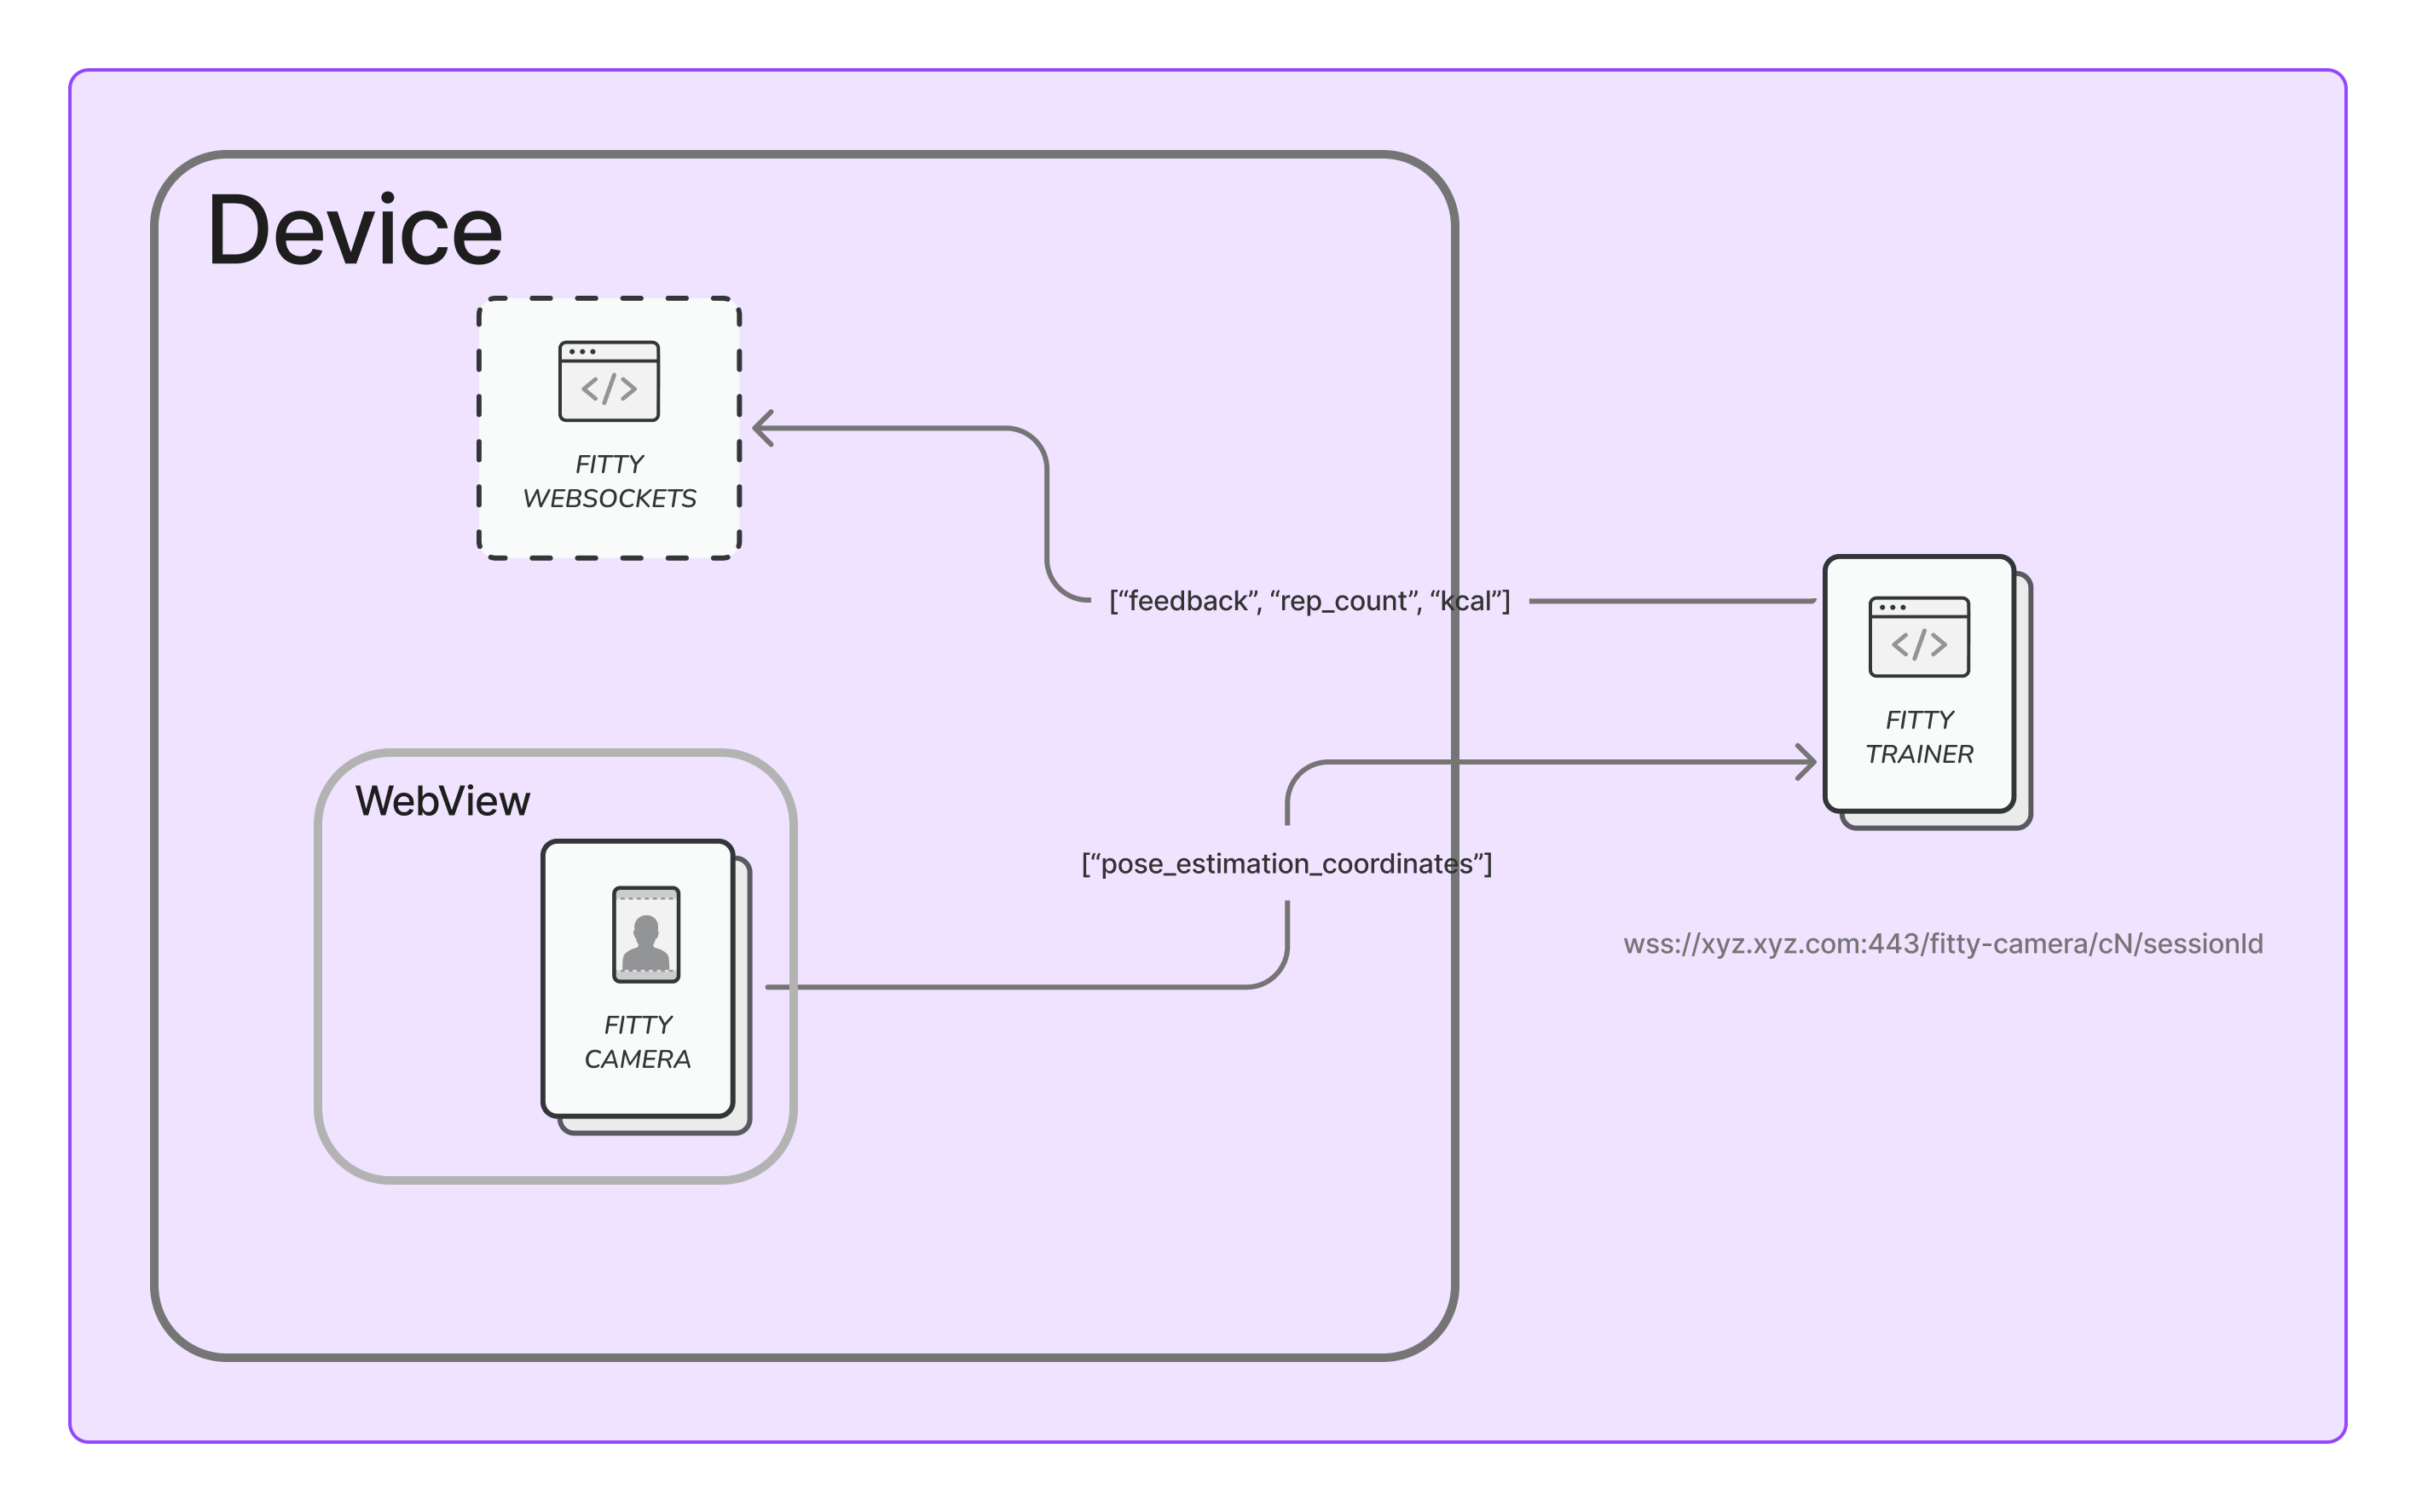
The overal architecture of the SDK can be seen bellow:
 The architecture is composed of two main components:
- The Fitty Camera is a web application that captures person’s joint coordinates, extracted via pose estimation. The pose-estimation computation is fully done on the client’s device thus the video feed never leaves the client’s device. It is recommended to use WebView to implement this component
- The Fitty Websockets are used to receive feedback, repetition count and other metrics computed from person’s joint coordinates by the Fitty Trainer running in our servers. Fitty Websockets are also used to communicate to the server which exercise the person should currently perform.
Setting-up the project
Setup the project
The project can be cloned from our private SDKs repository it also has an example Android application that is based on this tutorial: Please email our team at modestas.jurcius@fittyai.com to get access to the repository.
We recommend launching the java-websockets through Android Studio 2021.
Rendering WebView with Fitty Camera
Fitty Camera is accessed through a web application. To integrate it into your android device we recommend using a WebView component. First, create a webview component into your application activity or a fragment with a specific resource id (in the examples we use fittyCamera).
The web application is using camera feed thus depending on your android version you might need to ask for this permission:
    // import pub.devrel.easypermissions.EasyPermissions;

    EasyPermissions.requestPermissions(
          this,
          "This application needs camera access.",
          CAMERA_REQUEST_CODE,
          Manifest.permission.CAMERA);
The next step is generating a unique workout session GUID, that will represent a user session:
    // import pub.devrel.easypermissions.EasyPermissions;
    final String sessionGUID = java.util.UUID.randomUUID().toString();
Now we need to connect the webview to a workout session that will process user joint data from the users camera:
    final String clientName = "ASK-FOR-SUPPORT-TO-GET-THIS";
    final String sessionGUID = java.util.UUID.randomUUID().toString();
    if(ContextCompat.checkSelfPermission(getApplicationContext(),Manifest.permission.CAMERA)==PackageManager.PERMISSION_GRANTED) {
        fittyCamera = (WebView) findViewById(R.id.fittyCamera);
        fittyCamera.loadUrl(String.format("https://prod.fittyai.com/%s/fitty-camera/%s", clientName, sessionGUID));
        configureWebView(fittyCamera);
    }
    connectFittyWebsocket(sessionGUID);
The webview configuration is necessary to allow the application to work fully:
    public static WebView configureWebView(WebView webView) {
        WebSettings webSettings = webView.getSettings();
        webSettings.setJavaScriptEnabled(true);
        webSettings.setDomStorageEnabled(true);
        webSettings.setDatabaseEnabled(true);
        webSettings.setMediaPlaybackRequiresUserGesture(false);
        CookieManager.getInstance().setAcceptCookie(true);
        CookieManager.getInstance().setAcceptThirdPartyCookies(webView, true);
        webView.setWebViewClient(new WebViewClient());
        WebChromeClientCustomPoster chromeClient = new WebChromeClientCustomPoster();
        webView.setWebChromeClient(chromeClient);
        webView.setWebContentsDebuggingEnabled(true);
        return webView;
    }
After this step, if you compile the application you should see your camera feed and pose estimation drawings in your WebView.
Connecting to the Fitty Websockets
To receive repetition count, and feedback and communicate which exercises to track, the direct websocket client connection is required with the same session GUID. Here is a simple client example:
    private void connectFittyWebsocket(String sessionGUID) {
        URI uri;
        try {
            uri = new URI("wss://backend.fittyai.com:443");
        } catch (URISyntaxException e) {
            e.printStackTrace();
            return;
        }
        wsClient = new WebSocketClient(uri) {
            @Override
            public void onOpen(ServerHandshake serverHandshake) {
                Log.i("Websocket", "Opened");
                wsClient.send(String.format(sessionInitialisationEvent, sessionGUID));
            }

            @Override
            public void onMessage(String s) {
                final String message = s;
                runOnUiThread(new Runnable() {
                    @Override
                    public void run() {
                        TextView textView = (TextView)findViewById(R.id.textview_first);
                        textView.setText(message);
                    }
                });
            }

            @Override
            public void onClose(int i, String s, boolean b) {
                Log.i("Websocket", "Closed " + s);
            }

            @Override
            public void onError(Exception e) {
                Log.i("Websocket", "Error " + e.getMessage());
            }
        };
        wsClient.connect();
    }
To initialise the session from your android device send a session_start event from the client:
    String sessionInitialisationEvent = "{" +
        "    \"company_name\": \"YOUR_CLIENT_NAME\"," +
        "    \"jwt\": \"GENERATE-USING-OUR-API\"," +
        "    \"session_id\": \"%s\"," +
        "    \"event_type\": \"session_start\"," +
        "    \"user_bio_information\": {" +
        "        \"height\": 184," +
        "        \"weight\": 77," +
        "        \"gender\": 0" +
        "    }," +
        "    \"timestamp\": \"2022-03-01 12:32:12\"" +
        "}";

    wsClient.send(String.format(sessionInitialisationEvent, sessionGUID));
To generate a JWT please follow the instructions here.
At this point, you should have successfully connected to your webview session and can start communicating with the virtual trainer.

Communication with web sockets
Event types
Start Session
    {
        "company_name": "YOUR_CLIENT_NAME",
        "jwt": "GENERATE-FROM-OUR-API",
        "session_id": "11bc6524-7ae4-4e13-a994-a6593bc6297d",
        "event_type": "session_start",
        "user_bio_information": {
            "height": 184,
            "weight": 77,
            "gender": 0
        },
        "timestamp": "2022-03-01 12:32:12"
    }
Start New Exercise
    {
        "event_type": "start_exercise",
        "session_id": "11bc6524-7ae4-4e13-a994-a6593bc6297d",
        "timestamp": "2022-03-01 12:32:12",
        "exercise_id": "squat"
    }
Metric Response
    {
        "event_type": "state_update",
        "timestamp": "2022-03-01 12:32:12",
        "data": {
            "metrics": [
                {
                    "name": "rep_count",
                    "value": 3
                },
                {
                    "name": "calories",
                    "value": 12
                }
            ],
            "message": [
                {
                    "name": "feedback",
                    "value": "Spread your legs wider!"
                }
            ]
        },
        "version": "0.1v"
    }
Exercises Names for testing
| Exercise Id | Exercise Name |
|---|---|
| squat | Ordinary Squat |
| push_up | Ordinary Push Up |
| lay_down_push_up | Lay Down Push Up |
| sumo_squat_reach | Sumo Squat Reach |
The extended list of exercises can be provided on email request at darius.butkevicius@fittyai.com.